Showing posts with label Revlon. Show all posts

Sunday, May 17, 2015

Textured Dotted Nails

I'm back!

I really don't have an excuse for this, except that I have for the most part moved my nail art enterprises to Instagram, where I post as @coralpecan. I find this much easier as I work 50 hour workweeks and usually am so drained when I get home that the idea of blogging is somewhat unbearable. However, today I made an effort, so let me show you a design I did earlier today.

You will need:
A base and topcoat. Mine are Butter London's nail foundation and Orly's matte top coat.

You will also need dotting tools in various sizes. Mine I got at Sally's for about $2 USD, and this is the largest and the medium size. They are double ended so they have a small dotter on the other end.

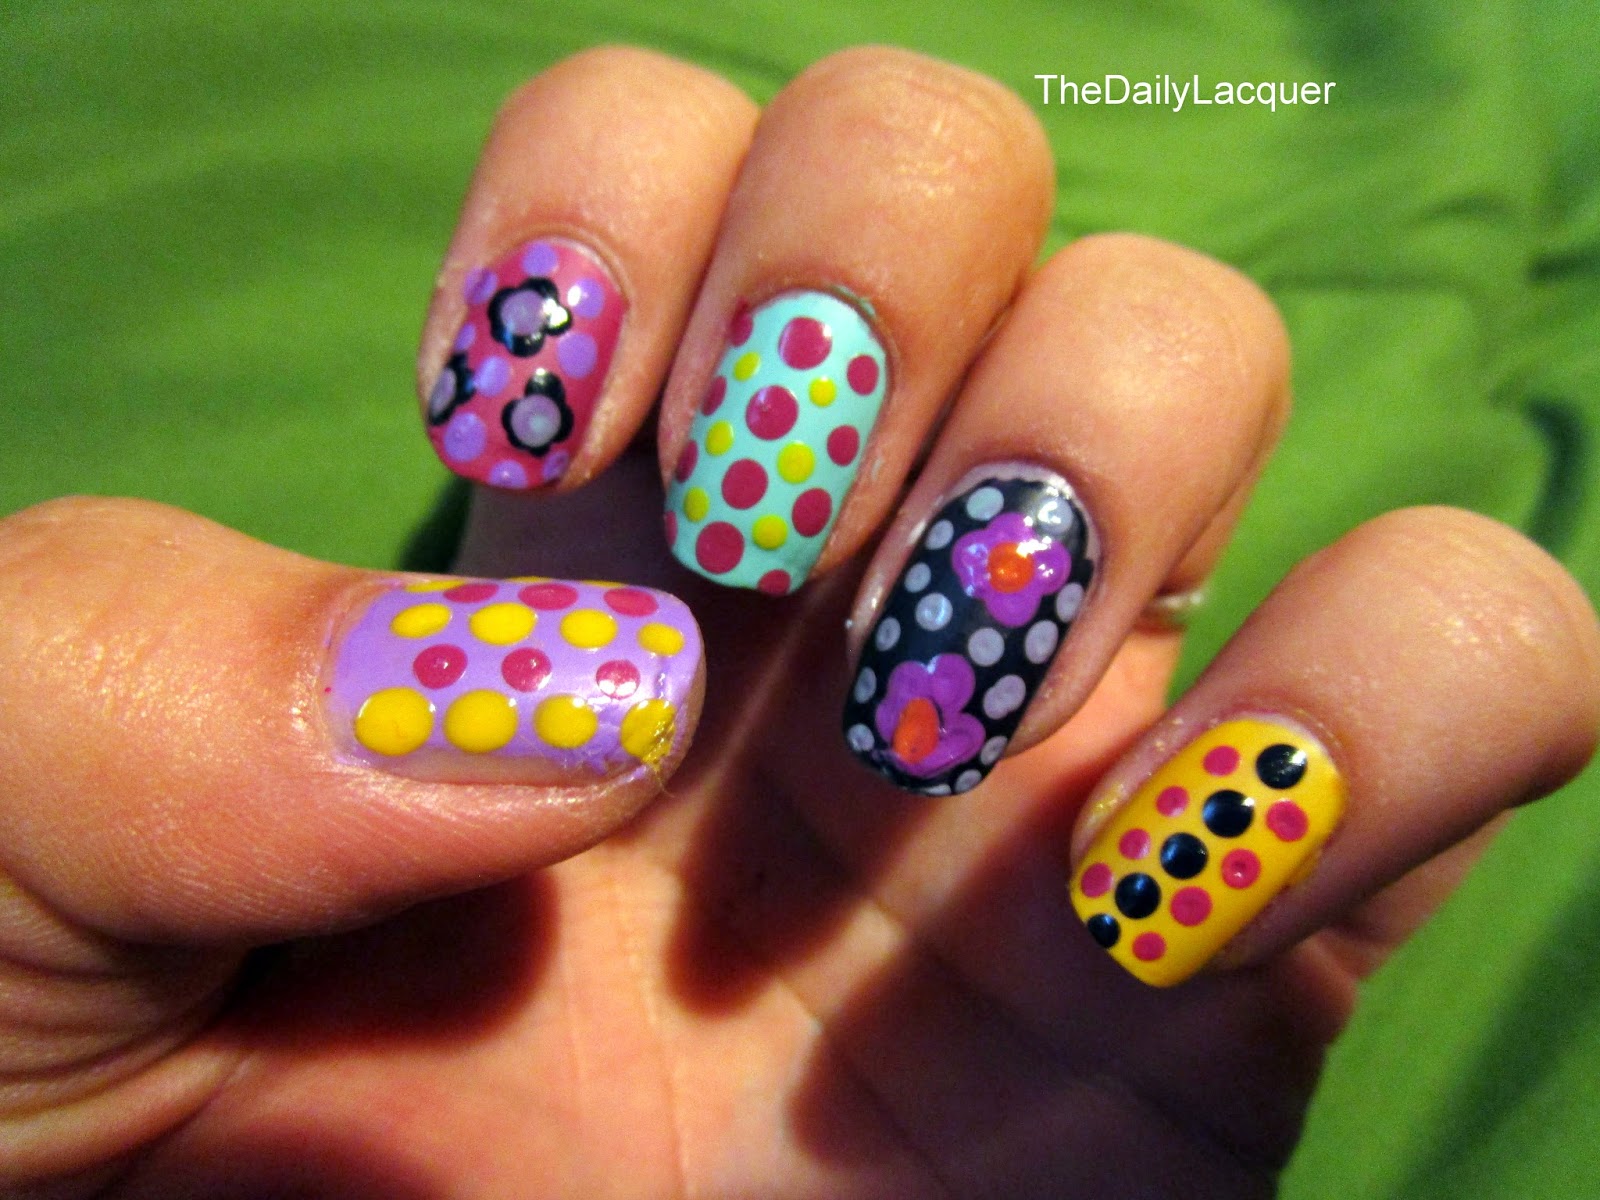
Here is my color scheme: Orly "Gumdrop" OPI "Just Lanai-ing Around" Kleancolor "Neon Blue" Revlon "Enchanting" and Sally Hansen "Mellow Yellow."

To begin, I painted each finger a different color, and put my matte topcoat over that base color. On top of that I did my dots and flowers. This gives it a 3D, textured effect.

The final product:

Just keep adding dots to fill as much negative space as you can, and pick a really great complementary color scheme. Have fun!

-Emmy


Sunday, December 28, 2014

Blue and Green Geometric Nails

I was inspired to do these nails when I saw a version of them in black and aqua on the girl helping me at Sephora the other day. Hers were aqua on black, so I decided to make mine my own by doing the dots in blue, the stripes in green and a textured accent nail.
I painted 4 of my nails white with Revlon "Sure Thing" and my accent nail with Essie "Lots of Luxe." I did my green stripes vertically on my thumb and horizontally on my middle finger with an L.A. Colors green striper. I used a bobby pin as a dotting tool and did a small diamond on my pinkie and a larger one on my index finger. That color is "Crystal Eyes" by SpaRitual.


Wednesday, December 24, 2014

Holiday Nail Art for Short Nails

Here is a very simple design for a holiday party or other event you can do with just a few colors of polish. I am with my family for the holidays, so I don't have any stripers, nail art pens or dotting tools, and only the few colors I keep here when I visit. So really, this is the perfect traveling for the holidays manicure.
The colors I used are Revlon "Sure Thing" (the white), NYC "Chelsea" (the red) and Claire's "Tin Man" (the silver). I painted a white base, then added 3 stripes of the red polish to my nail, two on the left and right edges and one in the middle. Then I filled in the empty spaces with the silver polish. The lines can be varying lengths, it really doesn't matter if they're all about the same or not. It's also really helpful to use a pretty dry brush to have the best control when placing the polish.


Sunday, November 2, 2014

Matte Dots and Lines

After painting my nails plain pink (Revlon Posh Pink) for a job interview yesterday, I decided to just add some simple dots and lines for a more interesting manicure. I added some horizontal, vertical and diagonal lines in various combinations on each nail, then filled in one line with black dots.
I thought a matte topcoat would look best with this design.
They are a little sloppy because I free-handed them, but I really should have done this with nail striping tape.


Saturday, October 25, 2014

Vintage Wallpaper Nails

These nails were inspired by some vintage 1940s wallpaper prints I saw online recently. Most of these floral prints consisted of dark, muted flowers and a dull green ivy on an off white or buff colored backdrop.
To begin, I painted all of my nails with "Kelsey" by Julep, which is a sort of pale peach color. Then I added large dots of Essie "Lilacism," Revlon "Cherries in the Snow" and OPI "Grand Canyon Sunset." While those were still wet, I swirled some of the peach color into them to give the illusion of petals and some depth to the design. With Maybelline "Tenacious Teal," I added leaf accents to the flowers I made and painted ivy designs on my index and ring fingers. My main recommendations are to choose a pigmented opaque green polish and to let your base color dry completely before creating your flowers.


Tuesday, October 7, 2014

Leopard Print and Red Wine Nails

Two of the biggest fashion trends at NYFW this fall were taupe shades, often accompanied by animal print, gold hardware and accents, and oxblood red. I decided to combine these elements into today's nail art.

To begin, I painted four of my nails white and one deep red- the shade I used was Pacifica's "Red, Red Wine." When the white was completely dry, I added NYC's "Brownstone" to a cosmetic sponge and added a variegated, light brown gradient effect to my four non-red nails. Then I added leopard spots using a pencil eraser I roughed up a bit dipped into Revlon's "Hot For Chocolate." On my accent nail, I took Orly's "Too Fab," a gold glitter polish and added a gradient to the tip of my nails. I just used the polish brush, adding glitter to the top 2/3 of my nail, then adding glitter only on the tip once the first coat of glitter had partially dried.


Sunday, September 14, 2014

Rose Garden Nails

I've been wearing Essie's Naughty Nautical for a while, and thought I'd add some nail art to it. This green/red color combo is really cool, it it would be a really nice compliment to a Poison Ivy Halloween costume. To make this a little bit tougher and less girly, you could add thorns to the roses and use either an emerald green or forest green instead of the teal.

First, I applied Revlon Cherries in the Snow just with the brush in the bottle in large sort of circular shapes and allowed that to dry for about 20 minutes. After that, I added little black curved lines with my black nail art pen. As a final touch, I took a nail art brush and some white polish to add a few highlights. I actually think it looked better before the highlights, but what's done is done, I guess.


Saturday, July 12, 2014

Dotted Bow Nails

It's been a long, long while since I have picked up a dotting tool, and I thought tonight would be a great time to play around with polka dots and some new colors I picked up lately. Since dotting (for me) is a pain in the butt on my opposite hand, I used my friend Emma's fingers to try out this look. The design is loosely based on Youtuber Elleandish's bow nails, and the color scheme is just based on a few of my new polishes I thought would look good together.

For this look, I used:
-Julep in "Bergen"
-Sally Hansen Xtreme Wear in "White On" and "Disco Ball"
-Tweezers for placing gems
-Revlon in "Enchanted"
-OPI in "Black Onyx"
-A pink card protector (Dragon Shield brand) for a palette for dotting the colors
-Red Carpet Manicure brand dotting tool
-Some gold rhinestones
-Ciate fast drying topcoat

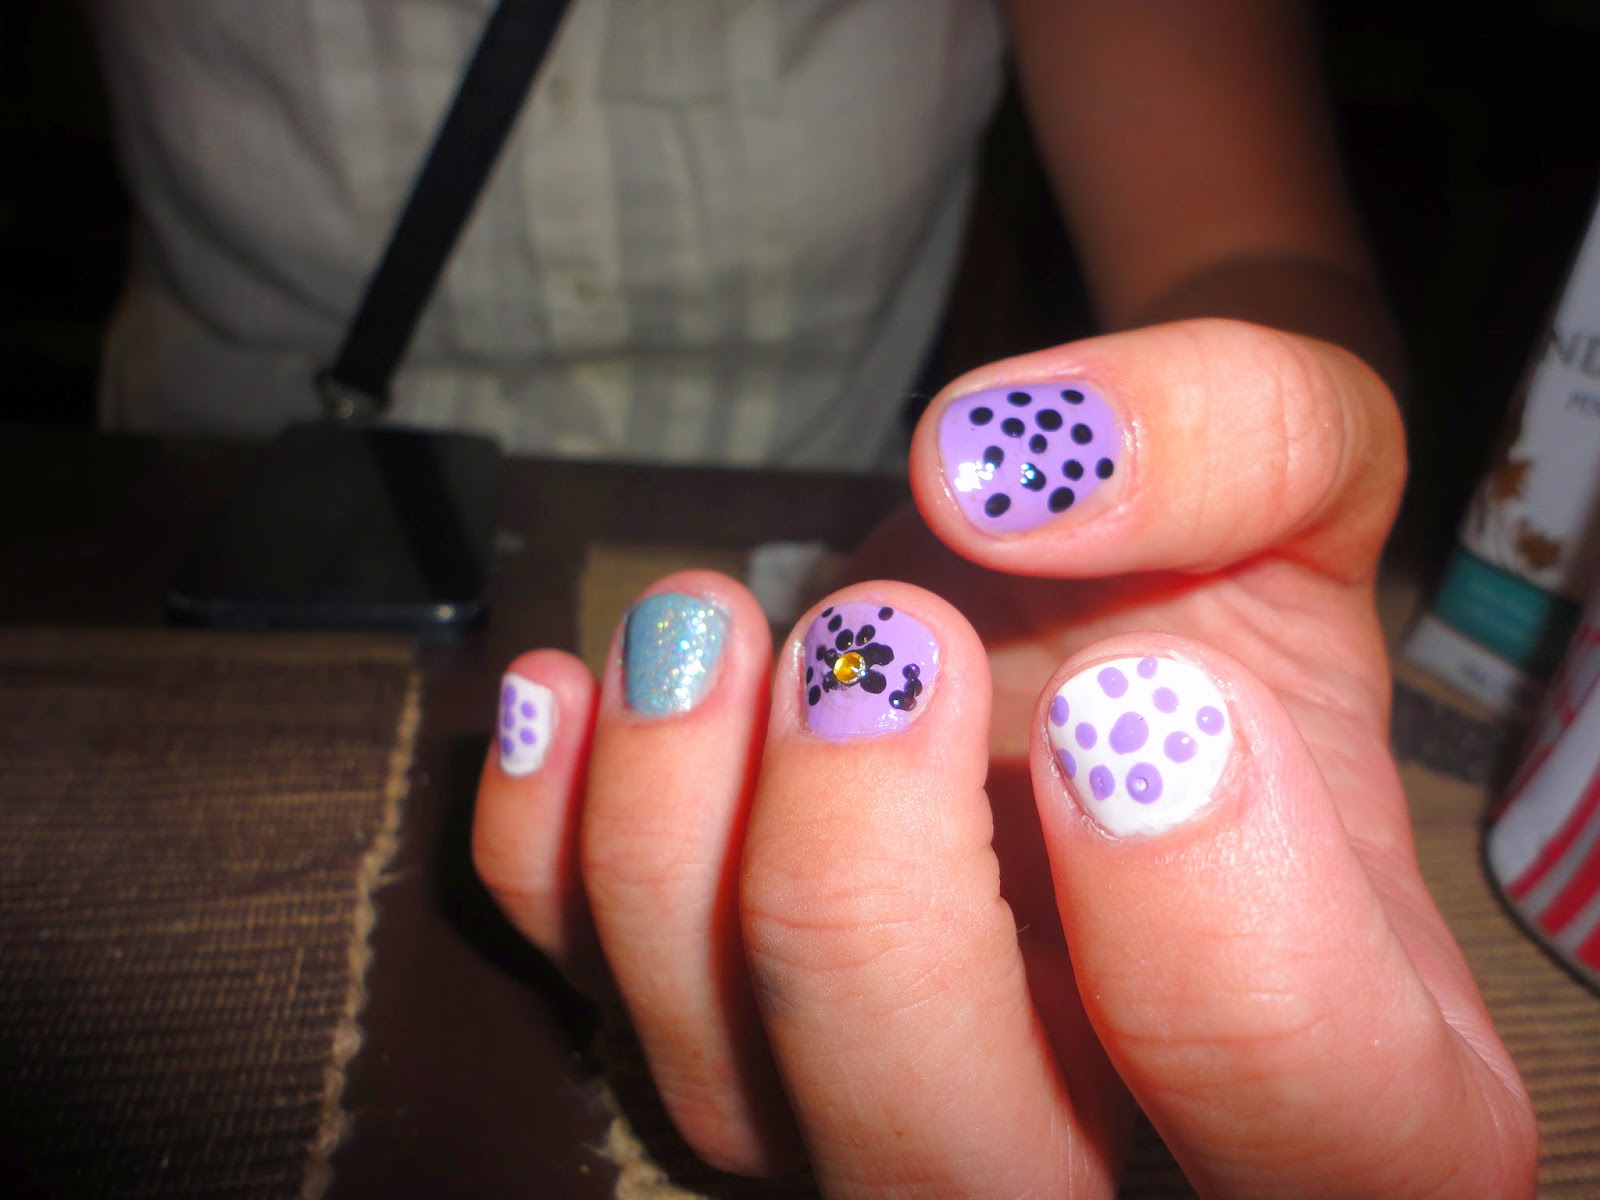
On the pinky and pointer: Two coats of White On, dots with small end of dotting tool in Enchanted.
On the ring finger: Two coats of Bergen and two coats of Disco Ball
On the thumb: two coats of Enchanted, small end of dotting tool dipped in Black Onyx
On the middle finger: two coats of enchanted, Large black dot in center of nail, small black dots in a bow shape around the central dot, gold rhinestone on top of the original large black dot.
Top coat on all of the nails once it dried.

More pictures of the finished manicure:


I really like the new polishes I used. Disco ball was a little disappointing because I thought it would be more full coverage based on how it looked in the bottle, but layered over the silver polish it actually looked really cool. This is a really good look for any nail length as you can add as many or as few dots to the nails as you think looks good.


Saturday, November 16, 2013

NYC- Big Apple Red

Revlon nail appliques were still going strong at the time I took this picture, so I left them on because the red was a good compliment to them. Big Apple Red is one of the core NYC polishes, and retails for $ .99 USD. They are available at drugstores and most retailers with drugstores in them.
The formula on this guy is a little thick, which left pools of color on the sides of my smaller nails. This caused the color to be darker in some places on the nail. However, the polish is a really nice bright red that is a good staple for any collection.
with the right topcoat and basecoat, the wear is pretty long without fading and tipwear is pretty minimal. Since they are so inexpensive, I would recommend getting a few in some basic colors if you like doing nail art. They would be perfect to add little dots and stripes to a manicure.


Wednesday, November 13, 2013

Essie- Smokin' Hot (Ft. Revlon by Marchesa)

As you may or may not know, the house of Marchesa has teamed up with Revlon to design a collection of nail strips inspired by Marchesa couture dresses. As baroque style is very big this fall, the collection is selling very well at CVS, which is the only place I know of that the strips are being sold. Each package contains 18 strips with various designs and sizes and they retail for $10 USD each.
To go with my strips, I also picked up a bottle of Smokin' Hot by Essie. This one is not a seasonal polish, but I think it goes well with fall and winter clothes. It was a good compliment to the strips I used on a few nails. The color is a dark gray with just a little bit of brown, but somehow it worked well with my black "jeweled noir" nail appliques.
Essie formulas have a tendency to be too thick. This results in minimal tipwear, but if the formula starts pooling, (especially on smaller nails), all the laquer can peel off at once on your nail, leaving an awkward gap in your design.
The nail strips are quite strong and high quality, similar to Essie's SleekSticks nail stickers. Unlike lower quality ones, they are actually quite flexible and conform to the nail without problems. Tipwear is pretty minimal, but be sure to place them correctly when putting them on as they do not like to move once they make contact with your nail.


Wednesday, November 6, 2013

Revlon- Cherries in the Snow

This is another shade from Revlon's core collection, which retails for about $5-6 USD and is available at Drugstores, retailers like Target, and Ulta. The polish is a red with a little softness, not a traditional red, but just as useful.
This formula is a little different from some of my other Revlon polishes in that it is very pigmented, and only required about a coat and a half to get opaque. Another really great thing is the fast dry time, which means that I didn't have to be patient before I drew my little bow detail on my ring finger. The color is I guess pink, or red with a tiny bit of white. It's a lovely color for wintertime that is less dramatic than a lot of the seasonal reds out there. The only real downside is the wear was not fantastic, but that may also be because I chewed the hell out of my nails the day before, and no amount of topcoat and basecoat can make a polish adhere well to an uneven surface. Overall, however, I think the polish is unique enough to merit a place in a large polish collection.


Friday, October 4, 2013

Revlon- Posh Pink

This polish is from Revlon's main nail enamel collection. They are normally about $5 USD per bottle. The price is unremarkable, as well as the color. It is a sheer, shimmery pink, which is opaque in about 3 coats. I would really like this color if it were a creme finish, but as a shimmer, it is about as ordinary as a pink nail polish can be.
However, I would like to commend the formula. It is not too thick, not too thin, not messy, easy to control and does not chip easily on the nail. The tip wear is minimal, especially with a topcoat.
Ultimately, I own about 5 or 6 Revlon polishes, and while the formula is really great, the colors are nothing special. In the future, I will look over the colors thoroughly and find something cool before I make a selection.


Saturday, September 28, 2013

Revlon- Hot for Chocolate

As much as some people seem to really like colors such as dark brown for fall, I just find it downright weird to paint my nails such a color. Hence, it is somewhat difficult for me to come up with creative ways to wear this polish. So, after watching Katy Perry's "Roar" for the ten millionth time, I decided to do a cheetah print on my nails with the polish.
To be honest, I don't really like this polish. It's thick, streaky, messy and is still somehow not opaque after two or three coats despite how dark it is. If it were less dark, I might like it, but it also chips in an annoyingly short amount of time to get any satisfaction from the polish alone.
Thus, I used it to add some more realistic color to my leopard nails. This look would be a little bit better if the color was a bit lighter, as it is indistinguishable from the black I used from a distance.
To create this look, I started off with a basecoat, and then one coat of a nude polish. Then I made splotches of various shapes and sizes of the aforementioned brown polish. After that dried, I used my Sally Hansen nail art pen to create little brackets and c shaped black spots on the nail. To finish off, I used my Butter London topcoat.