Showing posts with label Nicole by OPI. Show all posts

Sunday, November 16, 2014

Black Lace Nails

Here is a simple line drawing design that looks great on all fingers, a few fingers or an accent nail. You could really use any color, but I think a nude base looks best with a black lace design. The color I used was "Shari" by Julep.
To begin, I drew some diagonal lines perpendicular to each other on one corner of the nail for a cross hatching effect. Then I added a scalloped line closer to the center of my nail. To embellish, I added dots on the outside of the scallop and clusters of 3 lines on the highest amplitude parts of the scallop. If you are using a nail art pen and not a striper or toothpick to make your design, it's very important to seal the design with topcoat, or it will rub off! I used O.P.I's regular finish topcoat on mine.


Monday, October 27, 2014

Velvet Underground Bananicure

Here's a nail art tribute I did for Lou Reed/ The Velvet Underground, which takes inspiration from the "Andy Warhol" and "Loaded" album covers.
For my Andy Warhol banana nail, I first painted my nail white and let it dry completely. Then, I wiped most of the polish off of the brush for my yellow polish and drew a banana shape. This probably would have been more successful on a longer nail. When that was absolutely, completely dry, I used a black nail art pen to add high contrast to the banana.
For my "Loaded" inspired nails, I did a simple three color gradient like the smoke coming from the underground on the album. The three colors I used were Essie "Tart Deco" and OPI "Lincoln Park After Dark" and "Grand Canyon Sunset." I first painted my nail with "Tart Deco" then added the two other colors on a blending sponge and blended until I got the effect I wanted.


Saturday, October 25, 2014

Vintage Wallpaper Nails

These nails were inspired by some vintage 1940s wallpaper prints I saw online recently. Most of these floral prints consisted of dark, muted flowers and a dull green ivy on an off white or buff colored backdrop.
To begin, I painted all of my nails with "Kelsey" by Julep, which is a sort of pale peach color. Then I added large dots of Essie "Lilacism," Revlon "Cherries in the Snow" and OPI "Grand Canyon Sunset." While those were still wet, I swirled some of the peach color into them to give the illusion of petals and some depth to the design. With Maybelline "Tenacious Teal," I added leaf accents to the flowers I made and painted ivy designs on my index and ring fingers. My main recommendations are to choose a pigmented opaque green polish and to let your base color dry completely before creating your flowers.


Friday, October 3, 2014

Marbled Flame Nails

Disclosure: I received a bottle of No Text Red free from Sinful Colors/ Influenster in my quarterly VoxBox.

No Text red is part of Sinful Colors' recent campaign to combat texting and driving. The idea is to paint your thumbs red to remind yourself not to text while driving. Keeping this in mind, I wanted to create a look that emphasizes No Text Red as the main color.

To create the flame look, I first applied two full coats of the red polish, let dry, then applied a thicker coat of red. While it was still wet, I put a few large dots of black (OPI Black Onyx) at the base of my nail, then used a small dotting tool to drag and swirl the black around for the flame effect.

In all honesty, I really like the color "No Text Red" but the formula was really streaky and the brush is too long, which caused the polish to get everywhere. However, the retail price is only $1.99 USD and hey, it's a noble cause.


Sunday, September 21, 2014

The Jelly Sandwich Manicure

This manicure has been circulating beauty blogs and nail art YouTube channels for some time now, so I thought I would show you the glittery blue version I did yesterday. The concept is simple: Layer a glitter polish between an opaque polish and a sheer, jelly finish type polish. What I like about the finished result is that chunky glitter seems less textured on the nail and in my case, the jelly polish I chose made my glitter seem even more vivid and intense.
For my opaque polish I chose Layla "Aqua Zen" which is a bluish creme polish that dries almost matte. I guess you could call it a "satin" finish. My glitter is Nicole by O.P.I. in "A Million Sparkles." To get the application I did, I completely wiped off all glitter from one side of the brush and used a dabbing motion to pack glitter on each nail. On top is "Isle See You Later" by China Glaze. It's really sheer and I'm not even sure the glitter has a bluish tint at all, but it did really intensify the look of the glitter.
I think this manicure could also be really cool just applied as a french tip if you don't want the solid color plus glitter look.


Saturday, March 22, 2014

Wet N' Wild- Sunny Side Up

This polish is from the Wet n' Wild Wild Shine line, which is the 99 cent core collection from this brand. That being said, I think these polishes are a fairly good value.They are a little translucent and streaky, taking about 3 or 4 coats to look opaque. This particular polish also has a tendency to stain the nail, so apply a basecoat.
However, the color is unique in my collection. It is the only light orange I have. The wear is not great, so I also recommend a topcoat. I added some glitter: Nicole by OPI's Be Awesome and Love Your Life for a chunky and a finer milled glitter.


Wednesday, November 20, 2013

Color Workshop- ???

I bought a set of three of these colors last year on ebay, just to try out the brand. I believe it was $7.50 USD for the set of three. The set came with a blue, gold and pink shimmer polish. This entry is about the pink polish. It is a sheer pink shimmer with some very finely milled gold glitter in it.
Overall, it is one of the most disappointing purchases of polish I have ever made. At least the pink is wearable. The pigmentation is very weak, however, so lots of coats had to be applied. Another word I would use to describe this polish is boring. Once all the coats are applied, you're left with a very unspecial pink shimmer polish. To spice things up a bit, I added a glitter gradient (Nicole by OPI- A Million Sparkles) to give my nails some interest. Pictures of the before and after glitter are below.


Monday, November 11, 2013

Nicole by OPI- Love Your Life

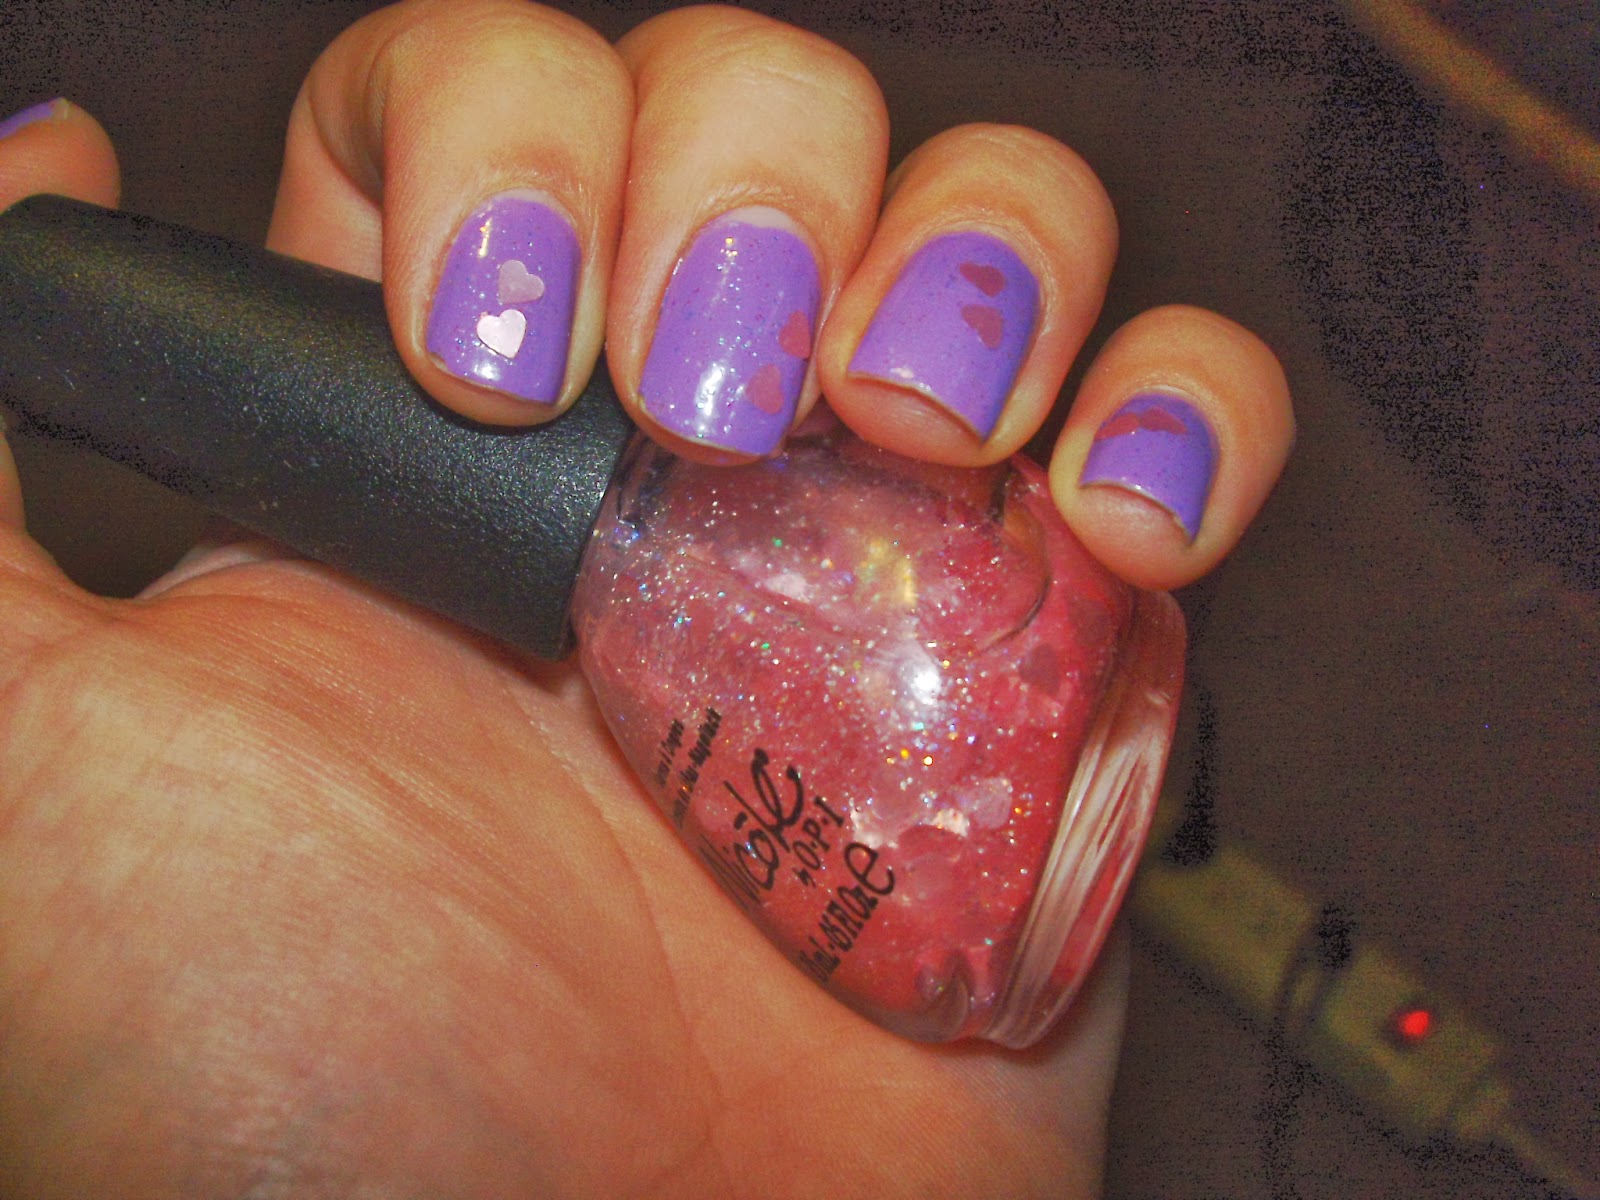
This is a pretty unusual polish and an interesting addition to the Nicole by OPI core collection. This polish features large, flat heart glitters and very fine pink, purple and holo glitters in a clear base. This is the first heart glitter I have seen in stores, and if I did not have a few other Nicole polishes, this would definitely make me curious enough to try the brand.
Like all the other Nicole polishes I own, the quality really impresses me. For the "cheaper" OPI line ($7.50 USD each), they have a lovely, strong formula and not one but two little marbles rolling around in there preventing it from drying. The fine glitters are a sure fire way to girlify any polish, because it is a glitter polish in a clear base, so it wouldn't make a big impact on its own. The only potential drawback to the polish is that the heart glitters are much heavier than the fine glitters and therefore, you are not guaranteed a heart in each coat.
This is fine if your taste level is a little bit more refined and subtle. However, if you wanted to do a special manicure for Valentine's day or something, I recommend using an orange stick to pick up individual hearts from the bottle and placing them on your nails.


Friday, November 8, 2013

Nicole By OPI- A Million Sparkles and Nabi- Purple II

A million Sparkles is a glitter polish that is part of the Nicole by OPI core collection. I do not believe it is a seasonal polish. The polish retails for $7.50 USD each, and is available at most drugstores, Ulta, and even Marshall's/T.J. Maxx/Ross! It is a mixture of red, yellow and blue glitters of various sizes and densities in a clear base, so definitely lay down a coat of a similar color before proceeding with glitter. Mine is "Plenty of Fish in the Sea" by Wet n' Wild.
Overall, I really like the versatility of this polish. Because it is mostly blue with gold and a bit of red, it looks cool with a lot of different colors underneath. Wear was pretty long, but since I messed up my ring finger on day 1, I did an accent nail the next day I wore it.
Nabi has approximately 30-something shades of magnetic polishes, which when they were released retailed for about $USD, but now are about $2 USD. The nice thing about them is the variety of different magnets they come with, so you do not have to use the one on the cap, which is often frustrating. I used the one on the cap for reviewing purposes here and because I only did one nail. Purple II comes with a concentric circle magnet.
Once you get over the weird color, the polish is pretty great. It dries fast, wears for a long time, and the magnet is easy to use. However, I just don't think it is the prettiest color out there. It's one of those shades of purple that kind of borders on dark brown. However, I recommend giving the whole Nabi selection of cheap magnetic polishes a try, and get them while you still can!


Thursday, October 17, 2013

Nicole by OPI- Miss-Magenta Me?

This is one of the more difficult to find polishes in the Nicole core collection, especially now that Modern Family and Selena Gomez are causing some retailers to start phasing out the classics. Nicole's polishes are $7 USD per bottle and should for the time being still be available at ULTA and most other beauty and drugstore type retailers.
Miss-Magenta Me? Is a true metallic, meaning it uses finely ground glass or muscovite mica instead of small glitters to achieve the texture and finish. The color is a beautiful purply pink which is thin and easy to control and is quite nearly opaque in one thin coat.
That being said, a fundamental problem with metallic polishes is that they exhibit a lot of brushstroking and definitely need a good coat of a trusted topcoat to finish the look and smooth things out. Another general thing about the Nicole by OPI brushes is that they tend to flare out over time, making the widest point during application wider than your nail, requiring some minimal cleanup afterwards. However, I really like this color for fall and winter, and the fact that it flatters a wide variety of skin tones is another plus.


Saturday, October 12, 2013

Nicole by OPI- Enchantress

This is a color from the core Nicole collection, not a Modern Family or Selena Gomez color. Nicole by OPI runs about $7 USD per bottle, and is available at drugstores, beauty stores, and mass retailers like T.J. Maxx. The color is a sheer pink duochrome, with flashes of blue and purple depending on the light.
As pretty as the color looks in the bottle, you are going to spend several fruitless hours painting tons of coats on your nail and waiting for that to dry. To get a more satisfactory result, I would recommend putting down a coat of white and two thin coats of Enchantress. I bet it would look really cool over black, too!
Excuse the messiness of the pictures below. My white polish was really acting up and got everywhere it was not supposed to go. You can't see it in the pictures, but the white polish also bubbled a lot. Enchantress is the high quality polish here, so get an equally high quality black or white base to match.