I'm back!
I really don't have an excuse for this, except that I have for the most part moved my nail art enterprises to Instagram, where I post as @coralpecan. I find this much easier as I work 50 hour workweeks and usually am so drained when I get home that the idea of blogging is somewhat unbearable. However, today I made an effort, so let me show you a design I did earlier today.
You will need:
A base and topcoat. Mine are Butter London's nail foundation and Orly's matte top coat.
You will also need dotting tools in various sizes. Mine I got at Sally's for about $2 USD, and this is the largest and the medium size. They are double ended so they have a small dotter on the other end.
Here is my color scheme: Orly "Gumdrop" OPI "Just Lanai-ing Around" Kleancolor "Neon Blue" Revlon "Enchanting" and Sally Hansen "Mellow Yellow."
To begin, I painted each finger a different color, and put my matte topcoat over that base color. On top of that I did my dots and flowers. This gives it a 3D, textured effect.
The final product:
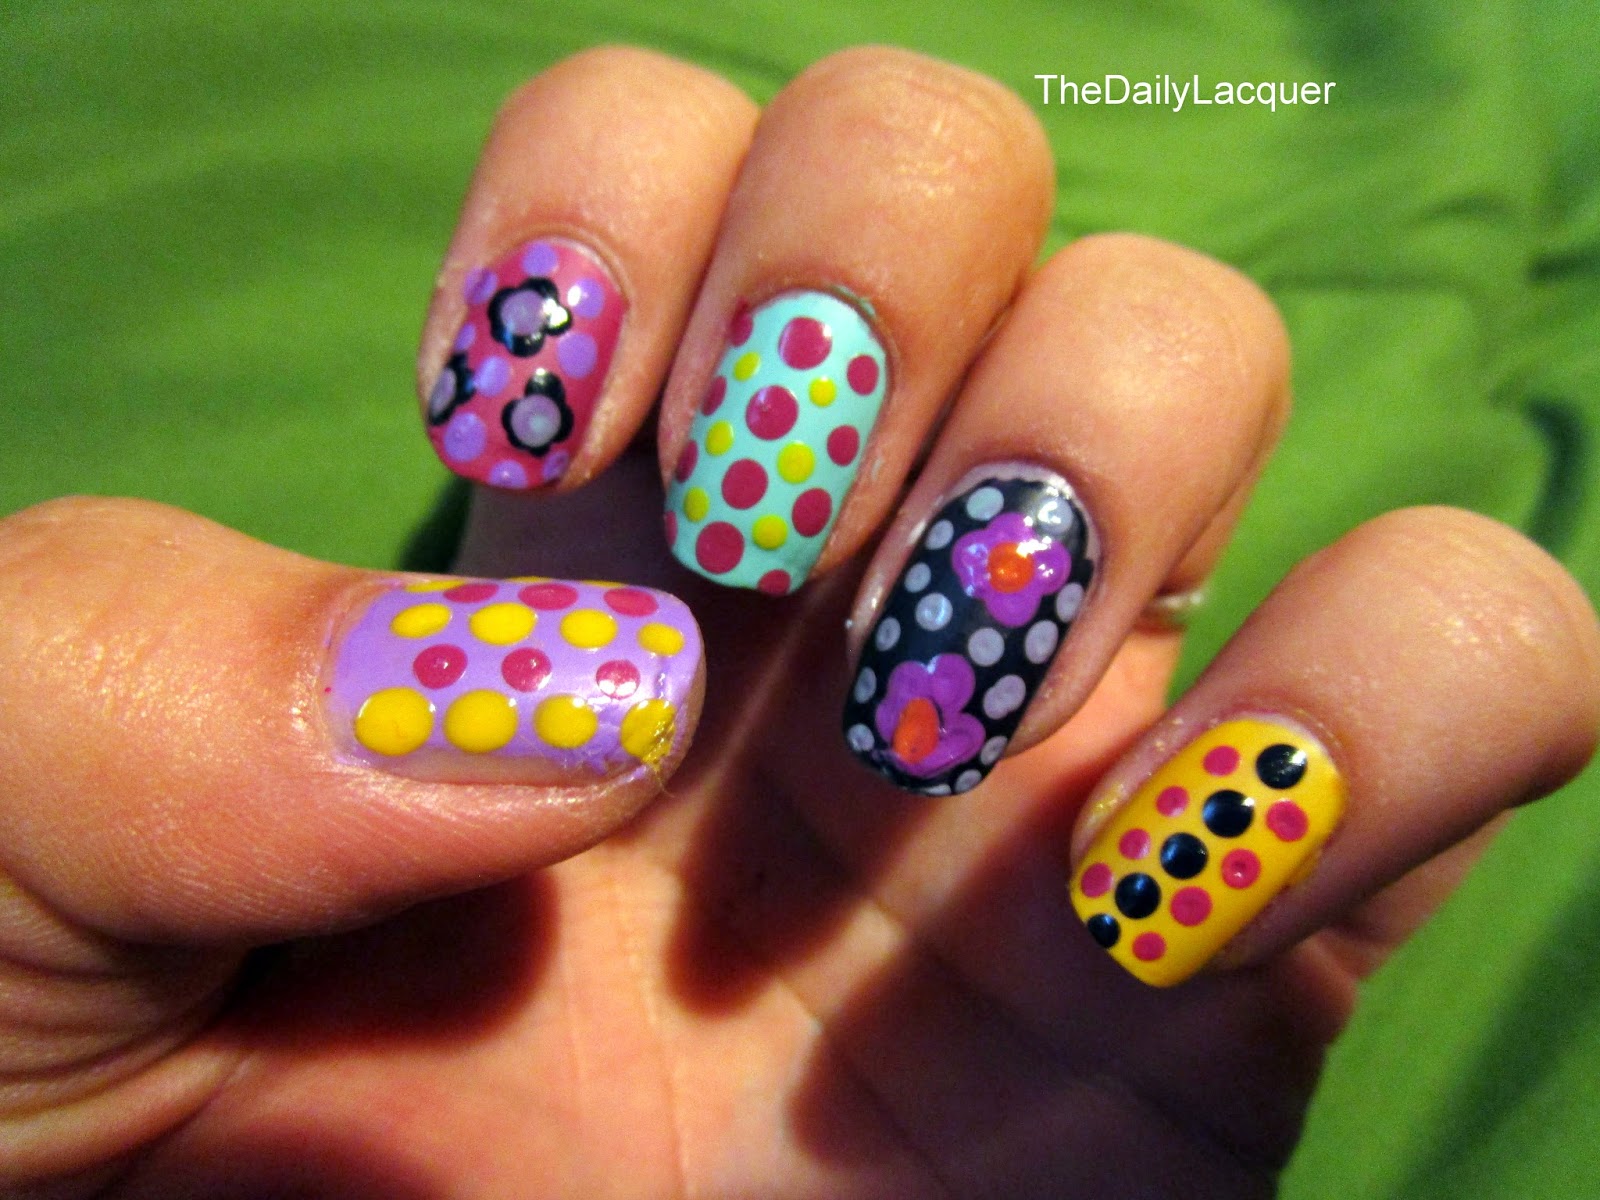
Just keep adding dots to fill as much negative space as you can, and pick a really great complementary color scheme. Have fun!
-Emmy
Showing posts with label Nail Art. Show all posts
Sunday, May 17, 2015
Sunday, December 28, 2014
Blue and Green Geometric Nails
I was inspired to do these nails when I saw a version of them in black and aqua on the girl helping me at Sephora the other day. Hers were aqua on black, so I decided to make mine my own by doing the dots in blue, the stripes in green and a textured accent nail.
I painted 4 of my nails white with Revlon "Sure Thing" and my accent nail with Essie "Lots of Luxe." I did my green stripes vertically on my thumb and horizontally on my middle finger with an L.A. Colors green striper. I used a bobby pin as a dotting tool and did a small diamond on my pinkie and a larger one on my index finger. That color is "Crystal Eyes" by SpaRitual.
Wednesday, December 24, 2014
Holiday Nail Art for Short Nails
Here is a very simple design for a holiday party or other event you can do with just a few colors of polish. I am with my family for the holidays, so I don't have any stripers, nail art pens or dotting tools, and only the few colors I keep here when I visit. So really, this is the perfect traveling for the holidays manicure.
The colors I used are Revlon "Sure Thing" (the white), NYC "Chelsea" (the red) and Claire's "Tin Man" (the silver). I painted a white base, then added 3 stripes of the red polish to my nail, two on the left and right edges and one in the middle. Then I filled in the empty spaces with the silver polish. The lines can be varying lengths, it really doesn't matter if they're all about the same or not. It's also really helpful to use a pretty dry brush to have the best control when placing the polish.
Sunday, November 23, 2014
Easy Snowflake Nails
These nails aren't explicitly "Holiday," just kind of wintery, which I think is okay for this early in the holiday season. The dark blue I used is Sally Hansen "Blue it" and the light blue is Essie "Bikini so teeny." I alternated dark and light blue the way I did because I thought too much of the dark metallic blue would overpower the look. To draw my white snowflakes/ stars, I made an X on my nail, then a plus sign. I find that works better somehow. Then I alternated between a half moon snowflake and a nail tip snowflake with a black nail art pen on the light blue nails. I think it looks fine without any glitter, but a silver glitter accent instead of a snowflake on one of your nails would be cool also.
Sunday, November 16, 2014
Black Lace Nails
Here is a simple line drawing design that looks great on all fingers, a few fingers or an accent nail. You could really use any color, but I think a nude base looks best with a black lace design. The color I used was "Shari" by Julep.
To begin, I drew some diagonal lines perpendicular to each other on one corner of the nail for a cross hatching effect. Then I added a scalloped line closer to the center of my nail. To embellish, I added dots on the outside of the scallop and clusters of 3 lines on the highest amplitude parts of the scallop. If you are using a nail art pen and not a striper or toothpick to make your design, it's very important to seal the design with topcoat, or it will rub off! I used O.P.I's regular finish topcoat on mine.
Friday, November 7, 2014
November Sky Nails
Sorry for not uploading sooner- Charter Communications has been a pain in the butt lately, and even though we pay a lot monthly for them, they seem to think internet access is a priveledge and not a right for their paying customers.
Anyways, here is a simple nail art design I came up with that is inspired by the bare trees and gray skies this time of year. The base color is "Bergen" which is from Julep (was limited edition this summer, not sure if it's still available), a lovely slightly shimmery blue-gray. I just added trees with a black nail art pen and a few dots in the background to represent chevrons of geese flying south. On my left index finger, my geese got smeared when I applied topcoat too quickly, but I thought the effect was cool.
Sunday, November 2, 2014
Matte Dots and Lines
After painting my nails plain pink (Revlon Posh Pink) for a job interview yesterday, I decided to just add some simple dots and lines for a more interesting manicure. I added some horizontal, vertical and diagonal lines in various combinations on each nail, then filled in one line with black dots.
I thought a matte topcoat would look best with this design.
They are a little sloppy because I free-handed them, but I really should have done this with nail striping tape.
I thought a matte topcoat would look best with this design.
They are a little sloppy because I free-handed them, but I really should have done this with nail striping tape.
Monday, October 27, 2014
Velvet Underground Bananicure
Here's a nail art tribute I did for Lou Reed/ The Velvet Underground, which takes inspiration from the "Andy Warhol" and "Loaded" album covers.
For my Andy Warhol banana nail, I first painted my nail white and let it dry completely. Then, I wiped most of the polish off of the brush for my yellow polish and drew a banana shape. This probably would have been more successful on a longer nail. When that was absolutely, completely dry, I used a black nail art pen to add high contrast to the banana.
For my "Loaded" inspired nails, I did a simple three color gradient like the smoke coming from the underground on the album. The three colors I used were Essie "Tart Deco" and OPI "Lincoln Park After Dark" and "Grand Canyon Sunset." I first painted my nail with "Tart Deco" then added the two other colors on a blending sponge and blended until I got the effect I wanted.
For my Andy Warhol banana nail, I first painted my nail white and let it dry completely. Then, I wiped most of the polish off of the brush for my yellow polish and drew a banana shape. This probably would have been more successful on a longer nail. When that was absolutely, completely dry, I used a black nail art pen to add high contrast to the banana.
For my "Loaded" inspired nails, I did a simple three color gradient like the smoke coming from the underground on the album. The three colors I used were Essie "Tart Deco" and OPI "Lincoln Park After Dark" and "Grand Canyon Sunset." I first painted my nail with "Tart Deco" then added the two other colors on a blending sponge and blended until I got the effect I wanted.
Sunday, October 19, 2014
Galaxy Nails and New Logo!
Here is my take on the very popular Galaxy nail art. After a little experimentation today, I figured out some preferences, what looks good and what does not. I figured out:
-Black is a much better backdrop than dark blue
-Add white to the black before adding a sheer polish of another color
-An eraser at the end of a pencil works much better than a dotting tool for adding planets
-Too many large stars detracts from the effect
-Adding a finely milled glitter top coat really ties it all together. I used Sally Hansen "Disco Ball" for this.
-To get a neater look, add colors in band across the nail, much like how galaxies really look in the night sky
Look to your upper right. See my new logo? I'd like to thank Danny Anduza, my wonderful boyfriend, (www.dannyanduza.com) for making it for me. Soon, maybe, this blog will be a respectable, professional looking thing with a cool background and watermarks and such. Also, I shot these images with my new Canon Powershot camera, so no more cell phone pictures! Yay!
-Emmy
-Black is a much better backdrop than dark blue
-Add white to the black before adding a sheer polish of another color
-An eraser at the end of a pencil works much better than a dotting tool for adding planets
-Too many large stars detracts from the effect
-Adding a finely milled glitter top coat really ties it all together. I used Sally Hansen "Disco Ball" for this.
-To get a neater look, add colors in band across the nail, much like how galaxies really look in the night sky
Look to your upper right. See my new logo? I'd like to thank Danny Anduza, my wonderful boyfriend, (www.dannyanduza.com) for making it for me. Soon, maybe, this blog will be a respectable, professional looking thing with a cool background and watermarks and such. Also, I shot these images with my new Canon Powershot camera, so no more cell phone pictures! Yay!
-Emmy
Tuesday, October 14, 2014
Dia de los Muertos nails
Here is an incredibly easy design for Halloween/ Day of the Dead you can do as just an accent nail or on all of your nails. This was very easy for me to do on my opposite hand also. The design is basically just strategically placed dots.
To begin, I started with an off white base- mine is "Transcend" by Sparitual. Then I just took my polish brush and added two dots for eyes. The orange I am using is a Wet n' Wild polish called "Sunny Side Up." After that, I took my nail art pen and drew two little black shapes on the base of the nail for a sort of contour, added four little dots in a diamond shape for a nose, then added dots around the eyes, a line for the mouth and a small triangle shape on the forehead.
Friday, October 3, 2014
Marbled Flame Nails
Disclosure: I received a bottle of No Text Red free from Sinful Colors/ Influenster in my quarterly VoxBox.
No Text red is part of Sinful Colors' recent campaign to combat texting and driving. The idea is to paint your thumbs red to remind yourself not to text while driving. Keeping this in mind, I wanted to create a look that emphasizes No Text Red as the main color.
To create the flame look, I first applied two full coats of the red polish, let dry, then applied a thicker coat of red. While it was still wet, I put a few large dots of black (OPI Black Onyx) at the base of my nail, then used a small dotting tool to drag and swirl the black around for the flame effect.
In all honesty, I really like the color "No Text Red" but the formula was really streaky and the brush is too long, which caused the polish to get everywhere. However, the retail price is only $1.99 USD and hey, it's a noble cause.
No Text red is part of Sinful Colors' recent campaign to combat texting and driving. The idea is to paint your thumbs red to remind yourself not to text while driving. Keeping this in mind, I wanted to create a look that emphasizes No Text Red as the main color.
To create the flame look, I first applied two full coats of the red polish, let dry, then applied a thicker coat of red. While it was still wet, I put a few large dots of black (OPI Black Onyx) at the base of my nail, then used a small dotting tool to drag and swirl the black around for the flame effect.
In all honesty, I really like the color "No Text Red" but the formula was really streaky and the brush is too long, which caused the polish to get everywhere. However, the retail price is only $1.99 USD and hey, it's a noble cause.
Sunday, September 28, 2014
Scarab Beetle Nails
These nails were inspired by a nail art picture showing a similar simple design but more of a tulip shape. I though I would add a bright green metallic polish, outline the shapes in black and color in the negative space red to resemble the back of a scarab beetle carapace.
The base color I used was "Impanema Girl" by Layla, and the red is "Stiletto" from Claire's over a white base.
I have some step-by-step photos down at the bottom to show you what I did.
The only tools required are black and white striper brushes or nail art pens.
The base color I used was "Impanema Girl" by Layla, and the red is "Stiletto" from Claire's over a white base.
I have some step-by-step photos down at the bottom to show you what I did.
The only tools required are black and white striper brushes or nail art pens.
Thursday, September 25, 2014
Rain Cloud Nails
This is a really simple, easy manicure that would be perfect for someone new to nail art or really bad at painting using their opposite hand. There are only 2 colors in the manicure, plus a glitter top coat. No brushes or dotting tools required!
The colors I used are Gumdrop by Orly, a pale teal color, Quinn by julep, a gray satin creme and Maybelline Color Show Street Art in "Blue Beats." It's just a variety of blue and black matte glitter pieces in a bunch of different shapes and sizes. For perhaps a gentler rainstorm, you could do a blue or silver chunky glitter.
I painted my nails with the teal color, and just painted a wavy line of gray near the tip of my nail and filled it in. When that was completely dry, I added my glitter and the new top coat I purchased, the Essence gel-look topcoat.
Overall, I am not impressed with the topcoat. it hasn't been 24 hours yet and I am getting some significant tip wear. I guess for only $1.99 USD I can't be too mad.
The colors I used are Gumdrop by Orly, a pale teal color, Quinn by julep, a gray satin creme and Maybelline Color Show Street Art in "Blue Beats." It's just a variety of blue and black matte glitter pieces in a bunch of different shapes and sizes. For perhaps a gentler rainstorm, you could do a blue or silver chunky glitter.
I painted my nails with the teal color, and just painted a wavy line of gray near the tip of my nail and filled it in. When that was completely dry, I added my glitter and the new top coat I purchased, the Essence gel-look topcoat.
Overall, I am not impressed with the topcoat. it hasn't been 24 hours yet and I am getting some significant tip wear. I guess for only $1.99 USD I can't be too mad.
Sunday, September 14, 2014
Rose Garden Nails
I've been wearing Essie's Naughty Nautical for a while, and thought I'd add some nail art to it. This green/red color combo is really cool, it it would be a really nice compliment to a Poison Ivy Halloween costume. To make this a little bit tougher and less girly, you could add thorns to the roses and use either an emerald green or forest green instead of the teal.
First, I applied Revlon Cherries in the Snow just with the brush in the bottle in large sort of circular shapes and allowed that to dry for about 20 minutes. After that, I added little black curved lines with my black nail art pen. As a final touch, I took a nail art brush and some white polish to add a few highlights. I actually think it looked better before the highlights, but what's done is done, I guess.
Thursday, September 11, 2014
Constellation Nails
Here is an alternative space themed manicure for those of you who are bored of galaxy nails. This one just highlights a few of the most famous stars in the Milky Way. I was thinking about doing this in plain black- but I think this metallic duochrome makes it that much cooler. David Bowie would totally approve.
The base color here is "Space Cadet" by Orly. I just added stars in the shapes of some familiar constellations in white with a small and a medium sized dotting tool. On my Little Dipper and Orion nails, I connected the dots with a white striper, but the rest I just left as is. I think it looks best with a combination of some connected and some not, but you could of course change the style by leaving them all as dots, connecting them all, or doing all of them over a black background.
Tuesday, September 9, 2014
Lily Pad Nails
Here is a "Blobicure" style nail art design I did yesterday. I do not claim to have come up with the idea, this is just my own take on a design Colette from Mysimplelittlepleasures did recently on her YouTube channel.
The blue color I used was China Glaze Tranzitions in "Modify me." step one was to apply one coat of the polish to each nail after using a base coat. For the blob part, I painted each nail with a generous second coat of polish, and while that was drying, added blobs of Wet n' Wild "I Only Eat Salads." when the second coat and the green blobs had dried, I added some white lines to look a little bit like flowers on a few of the lily pads. The Tranzition colors change color once top coat is applied, so the blue became much darker and the green lily pads had more contrast than before. Overall, I'm pretty happy with how it turned out.
Saturday, September 6, 2014
Dragonfruit Nails
This very cute and easy manicure was inspired by the cross section of a Dragon Fruit or Pitaya. They're delicious, smell great, and are gaining popularity in America mostly as a flavor in beverages and as fragrance.
The color I used for the outside of my dragon fruit is Essie's "Too Taboo." It's the right shade: kind of a bright pink with just a hint of purple. The formula was a little odd to work with: it went on a little streaky and weirdly matte, but after a nice layer of top coat, the texture and color saturation were just fine.
To get this look, I painted my nails white, then added two diagonal stripes of "Too Taboo." When the white was completely dry, I took a dotting tool dipped into black polish and added my seeds. Dragon fruits don't seem to have any specific arrangement to their seeds, so any way you would like to do your black dots is fine.
The color I used for the outside of my dragon fruit is Essie's "Too Taboo." It's the right shade: kind of a bright pink with just a hint of purple. The formula was a little odd to work with: it went on a little streaky and weirdly matte, but after a nice layer of top coat, the texture and color saturation were just fine.
To get this look, I painted my nails white, then added two diagonal stripes of "Too Taboo." When the white was completely dry, I took a dotting tool dipped into black polish and added my seeds. Dragon fruits don't seem to have any specific arrangement to their seeds, so any way you would like to do your black dots is fine.
Monday, August 11, 2014
Recent Nail Art
I guess I've been doing a lot of nail art lately, so I am just going to show you three designs I've done lately with some thoughts about the polishes and tools I used for them.
1. Star Trek Galaxy Nails
For the pink base on the pinkie, middle and index, I used Zoya "Dot." For the galaxy nails, I stamped some blue and purple neon polish on the nails, added stars with a white striper and added glitter with Sally Hansen "Disco Ball." For my starfleet uniform nail, I painted the nail blue Julep "Iona"and added a wavy black line to the tip. For the Commbadge, I cut up a nail sticker in the desired shape and put it on the nail.
I freehanded the Enterprise with a black nail art pen and covered it with the same glitter as the galaxy nails.
2. Starfleet Uniform Nails
A simpler version of the ring finger on the previous design with red, yellow and blue polishes. I suppose you could add some rhinestones to show ranks on some of your nails.
3. Neon Leopard Print
These I did with my Kleancolor neon polishes, white striper and black nail art pen. The key to this look is a high density of spots.
1. Star Trek Galaxy Nails
For the pink base on the pinkie, middle and index, I used Zoya "Dot." For the galaxy nails, I stamped some blue and purple neon polish on the nails, added stars with a white striper and added glitter with Sally Hansen "Disco Ball." For my starfleet uniform nail, I painted the nail blue Julep "Iona"and added a wavy black line to the tip. For the Commbadge, I cut up a nail sticker in the desired shape and put it on the nail.
I freehanded the Enterprise with a black nail art pen and covered it with the same glitter as the galaxy nails.
2. Starfleet Uniform Nails
A simpler version of the ring finger on the previous design with red, yellow and blue polishes. I suppose you could add some rhinestones to show ranks on some of your nails.
3. Neon Leopard Print
These I did with my Kleancolor neon polishes, white striper and black nail art pen. The key to this look is a high density of spots.
Labels:
Glitter,
Julep,
Kleancolor,
Nail Art,
Nail Stickers,
Neon,
OPI,
Sally Hansen,
Zoya
Tuesday, August 5, 2014
Julep- Paulette
This polish is one of Julep's limited edition monthly polishes from the May "Fresh Twist" collection. It's one designed for the "Boho Glam" girl, but I still really like it a lot. It's a beautiful color: a light purple with a gold shimmer.
The formula is really thick, and I guess I really could have gone with only one coat. However, like most Julep polishes, the first coat dried a little matte, so I felt the need to add another one. One thing I like about the polish, as with most "indie" polishes is that it's high quality enough to not smell like the toxic sludge that goes into some mass market polish.
To create my "fishnet" or "quilted" design, I just positioned some pieces of striping tape over the dry polish at 90 degree angles from each other and painted black over it, allowing no dry time and peeling the tape off right away so that the polish wouldn't chip while reveling the design.
The formula is really thick, and I guess I really could have gone with only one coat. However, like most Julep polishes, the first coat dried a little matte, so I felt the need to add another one. One thing I like about the polish, as with most "indie" polishes is that it's high quality enough to not smell like the toxic sludge that goes into some mass market polish.
To create my "fishnet" or "quilted" design, I just positioned some pieces of striping tape over the dry polish at 90 degree angles from each other and painted black over it, allowing no dry time and peeling the tape off right away so that the polish wouldn't chip while reveling the design.
Thursday, July 31, 2014
Teepee nails
Hello all! Sorry for that two week hiatus- I was doing paleontological fieldwork up in northern Montana with very slow internet access and no nail polish. Anyways, I thought I would do a little tribute to the teepee that was my home for the better part of two weeks up there while we excavated dinosaur nests.
I chose to do kind of a sunrise look using oranges and blue. The colors I used were Wet n' Wild "Sunny Side Up," Sally Hansen Xtreme wear in "Crushed" and Mineral Fusion in "Grotto." I put them on a beauty blending sponge and applied over a white base to achieve the effect.
For the teepee, I drew a triangle shape with a white striper and outlined with a black nail art pen. I drew the door with black polish.
The finished look:
And the inspiration:
I chose to do kind of a sunrise look using oranges and blue. The colors I used were Wet n' Wild "Sunny Side Up," Sally Hansen Xtreme wear in "Crushed" and Mineral Fusion in "Grotto." I put them on a beauty blending sponge and applied over a white base to achieve the effect.
For the teepee, I drew a triangle shape with a white striper and outlined with a black nail art pen. I drew the door with black polish.
The finished look:
And the inspiration:
Subscribe to:
Posts (Atom)


